You want a fast, secure website, and setting up your content management system through your web host’s control panel is the most reliable way to start. For website owners, configuring server files can seem daunting, but modern tools make the process seamless. Before you begin building pages, you need an active domain name and a solid server foundation. If you are exploring your options, evaluating WordPress hosting in Pakistan ensures you have the necessary server resources to handle local and global traffic smoothly. We offer optimized cPanel environments tailored for Pakistani users, complete with automated tools and unlimited features that make launching a website incredibly straightforward.
Pre-Installation Server Requirements
Before you install any software, your server must meet specific baseline criteria. To guarantee compatibility, security, and optimal performance, you need to verify that your host supports PHP 7.4 or greater and MySQL 5.7 or MariaDB 10.3, as outlined in the official WordPress requirements. Finding the best web hosting for wordpress in pakistan guarantees these technical benchmarks are met without requiring complex manual server configuration. Our hosting plans come pre-configured with the latest PHP versions, MariaDB databases, and free SSL certificates to guarantee maximum uptime and security from day one.
Method 1: Automated Installation via Softaculous
The fastest and most efficient way to get your website online is by using the Softaculous Apps Installer built directly into your control panel. This automated script handles database creation, file extraction, and directory configuration instantly.
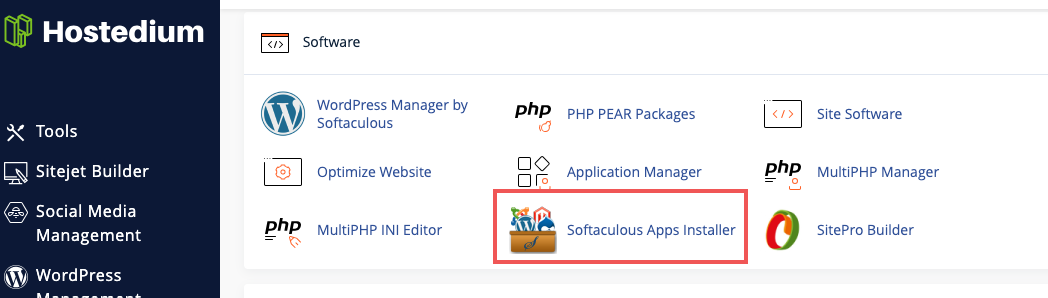
Step 1: Access the Installer
Log into your cPanel account using the credentials provided in your welcome email. Scroll down to the “Software” section and click on the “Softaculous Apps Installer” icon. This will open a new dashboard displaying various scripts. Hover over the prominent “W” logo and click “Install” to open the setup form.
Step 2: Configure Site Details
You will see a detailed configuration page. Under “Software Setup,” select the “https://” protocol to ensure your site loads securely over SSL. Choose your domain name from the drop-down menu. Leave the “In Directory” field blank unless you specifically want your site to load at a subfolder like “/blog”.
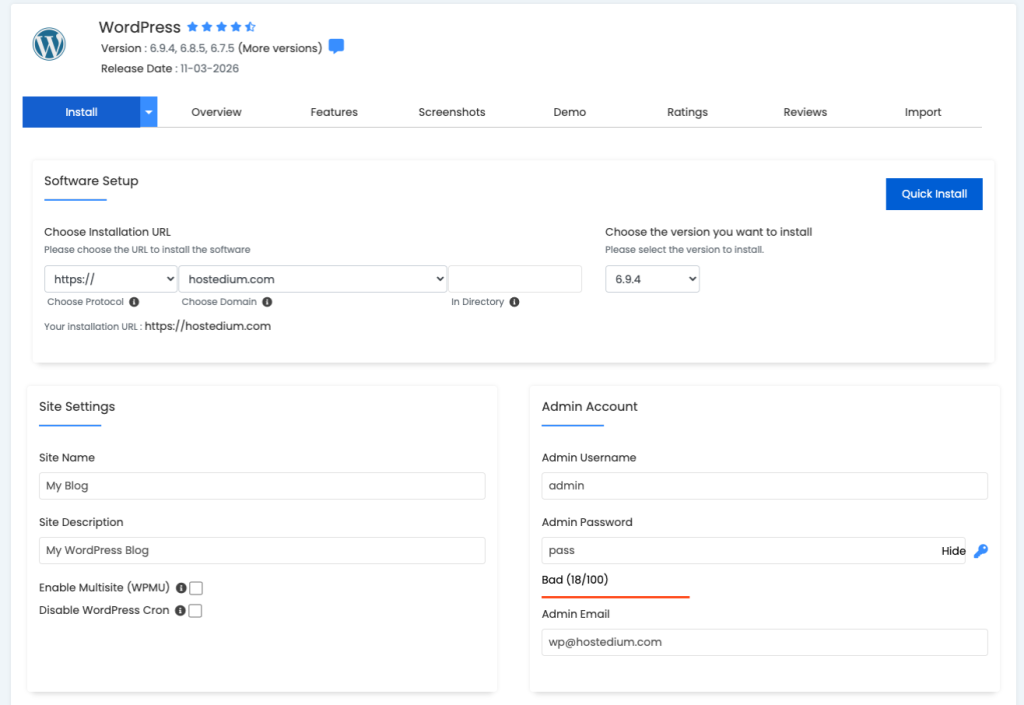
Step 3: Set Admin Credentials
In the “Site Settings” section, enter your Site Name and Site Description. Move down to the “Admin Account” area. Create a strong, unique username and a complex password. Avoid using “admin” or your own name as the username, as these are common targets for brute-force attacks. Enter a working email address where password resets and system notifications will be sent.
Step 4: Complete the Installation
Scroll to the bottom of the page, bypassing the advanced options and theme selection for now. Click the “Install” button. A progress bar will appear, and the automated system will finalize the setup in under a minute. You will receive a success message containing the URL to your new login dashboard.
Method 2: Manual Installation via File Manager
For users who prefer complete control over the setup process and file hierarchy, manual installation remains the standard alternative. This method requires downloading the core files and creating a database manually.
Step 1: Download Core Files
Visit the official software repository and download the latest version in a zip file format to your local computer. Do not extract the zip file yet.
Step 2: Create a Database and User
Return to your cPanel dashboard and navigate to the “MySQL Database Wizard” under the “Databases” section. Create a new database with a recognizable name. On the next screen, create a database user and generate a strong password. Save these three details – the database name, username, and password – in a temporary text file. Check the “All Privileges” box to link the user to the database.
Step 3: Upload and Extract Files
Navigate back to the main cPanel screen and open the “File Manager”. Double-click the “public_html” folder. Click “Upload” in the top menu and select the zip file you downloaded earlier. Once the upload hits 100 percent, go back to the public_html directory, select the zip file, and click “Extract”. Move all the extracted files out of the resulting subfolder directly into the main public_html root directory.
Step 4: Run the Setup Wizard
Open a new web browser tab and type in your domain name. You will be greeted by the famous five-minute installation wizard. Select your preferred language and click “Let’s go”. Enter the database name, username, and password you created in Step 2. Leave the database host as “localhost”. Submit the form, “Run the installation,” and enter your final site title and admin credentials to finish the process.
Post-Installation Configuration
Once the core software is running, you must configure fundamental settings to ensure proper functionality and search engine visibility. Completing these actions immediately prevents broken links and security vulnerabilities down the line.
| Configuration Setting | Action Required | Why It Matters |
|---|---|---|
| Permalinks Structure | Change to “Post name” in Settings. | Creates clean, readable URLs that improve search engine ranking and user experience. |
| SSL Certificate Verification | Ensure “https” forces across all pages. | Protects user data, encrypts traffic, and removes browser security warnings. |
| Default Content Removal | Delete the “Hello World” post and sample page. | Prevents test content from being indexed by search engines. |
| Timezone Setup | Set local timezone in General Settings. | Ensures scheduled posts and automated backups run at the correct local time. |
Expert Answers to Your Top WordPress Setup Questions
Do I need technical coding skills to use cPanel?
No coding skills are required to navigate or utilize the control panel. The interface is highly visual, relying on clear icons and simple forms to execute complex server commands like file extraction and database management automatically.
Can I install the software on a subdomain?
Yes, you can easily install the application on a subdomain. Simply create the subdomain first in your control panel, then select it from the domain drop-down menu during the automated Softaculous installation process.
How long does the entire installation process take?
If you use the automated one-click installer method, the entire process from logging in to viewing your live site takes less than five minutes. The manual database creation and file upload method typically takes ten to fifteen minutes.
Is the automated installer safe to use?
The automated installer is incredibly safe and widely considered the industry standard. It downloads core files directly from official, secure repositories and configures correct file permissions automatically to prevent security vulnerabilities.
What should I do if the installation fails halfway?
If an installation fails, delete any partially created databases and clear the public_html directory of leftover files. Verify that your server has enough disk space available, then restart the installation process from the beginning.
How do I access my site dashboard after installation?
You can access your administrative dashboard by adding “/wp-admin” to the end of your main domain name in your browser’s address bar. Use the admin username and password you created during the setup steps to log in.
Will running the installer delete my existing website files?
If you install the software in a directory that already contains files, such as an old HTML website, the installer may overwrite files with the same name. Always back up existing data or install into a clean, empty directory.